Master Juicy Chicken Breasts: Brining & Even Cooking Secrets
For many home cooks, the boneless, skinless chicken breast is both a blessing and a curse. Loved for its lean protein, quick cooking time, and versatile mild flavor, it often falls victim to a culinary fate worse than blandness: dryness. The fear of undercooked poultry leads many to push their chicken breasts past their prime, resulting in a rubbery, sawdust-like texture that gives this kitchen staple an undeserved bad reputation. But it doesn't have to be this way! With a few simple techniques focusing on proper preparation and precise cooking, you can transform bland, dry chicken breasts into consistently juicy, tender, and flavorful meals. This article will reveal the secrets to truly master **how to cook chicken breasts**, ensuring they are moist and delicious every single time.
Why Chicken Breasts Get a Bad Rap (And How to Ensure They Don't)
The inherent leanness of chicken breasts is a double-edged sword. While appealing for health-conscious eaters, the lack of fat means there's less "insurance" against overcooking. Unlike fattier cuts like thighs, breasts can go from perfectly cooked to dry and tough in a matter of minutes. However, understanding this characteristic allows us to adapt our methods and turn what some consider a flaw into an asset. With the right approach, you're rewarded with satisfying, fast, and potentially even caramel-crisp meat that could win over even the most ardent dark-meat fans.
The Golden Rule: Don't Overcook!
The single most critical piece of advice for juicy chicken breasts is to avoid overcooking. It's the primary culprit behind their dry, tough texture. Instead of guessing or cutting into the meat (which only releases precious juices), invest in an instant-read meat thermometer. This simple tool is your best friend. Chicken breasts are safely cooked when their internal temperature reaches
165°F (74°C) at the thickest part. Remove them from the heat immediately when they hit this mark.
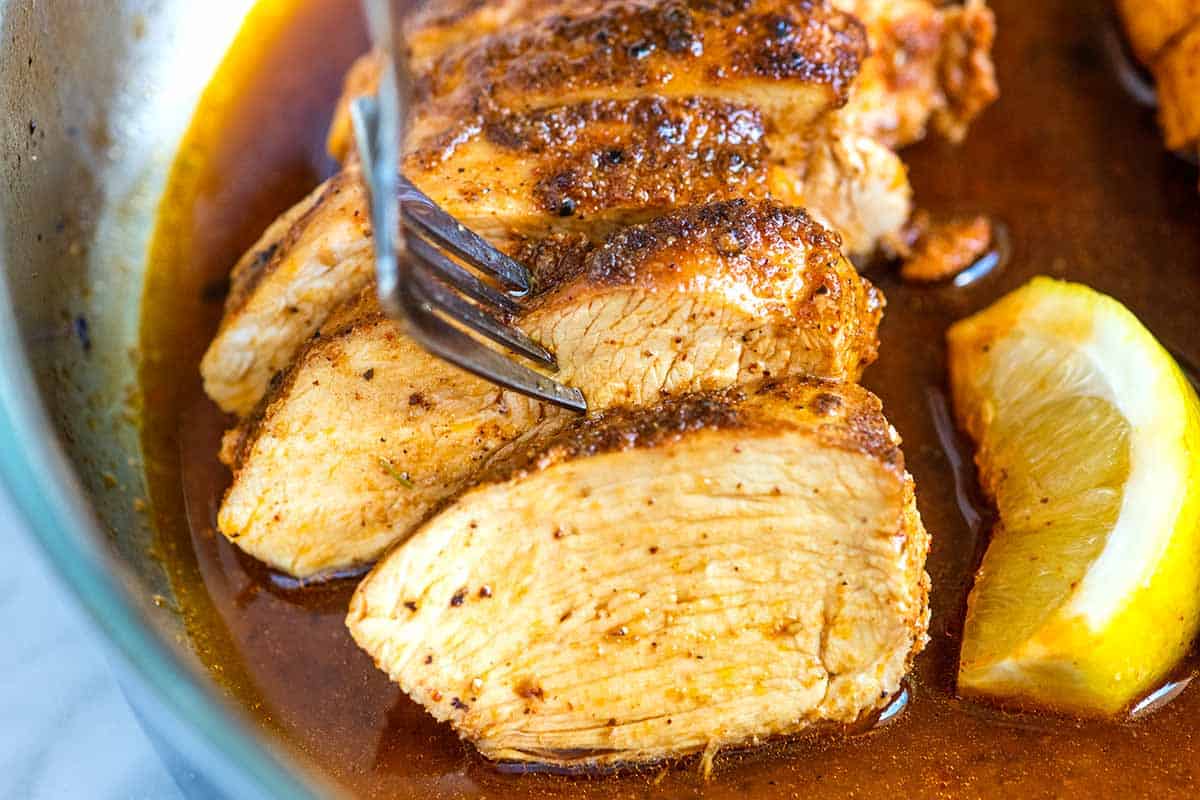
Resting: The Crucial Final Step
Once cooked, resist the urge to slice into your chicken breasts right away. Just like a good steak, chicken needs to rest. This allows the muscle fibers to relax and the internal juices to redistribute evenly throughout the meat. A rest of 5-10 minutes under a loose tent of foil will result in noticeably juicier chicken. Skip this step, and those delicious juices will simply run onto your cutting board.
The Secret Weapon: Brining for Unbeatable Juiciness
If you want to know **how to cook chicken breasts** that are incredibly tender and juicy, even if you accidentally overcook them by a minute or two, brining is your secret weapon. Brining isn't just for Thanksgiving turkeys; it's a game-changer for lean chicken breasts.
How Brining Works Its Magic
At its core, brining is the process of soaking meat in a saltwater solution (wet brine) or applying salt directly to the surface (dry brine). The salt works on the muscle proteins in two key ways:
- It denatures the proteins, causing them to loosen and unwind. This allows them to absorb and hold onto more moisture during cooking.
- It seasons the meat from within, ensuring that every bite is flavorful, not just the surface.
The result? Chicken breasts that are remarkably moist and seasoned throughout, creating a more forgiving cooking experience.
Wet Brining: A Hydration Boost
A wet brine involves submerging chicken breasts in a solution of water, salt, and often sugar, herbs, and spices.
- Method: Dissolve 1/4 cup of kosher salt (and optionally 2 tablespoons of sugar) in 4 cups of water. Add any desired aromatics like bay leaves, peppercorns, or garlic cloves. Submerge the chicken breasts completely.
- Time: Brine for at least 30 minutes, but no more than 4 hours, in the refrigerator. Too long, and the chicken can become too salty or develop a mealy texture.
- Benefit: Excellent for adding a significant moisture boost.
Dry Brining: Simple & Effective
Dry brining is a simpler method that achieves similar results with less fuss. It involves seasoning the chicken breasts directly with salt before cooking.
- Method: Pat your chicken breasts dry. Sprinkle them generously all over with kosher salt (about 1/2 teaspoon per breast). You can also add other seasonings at this stage.
- Time: Let them sit at room temperature for 30 minutes to an hour, or in the refrigerator for up to 12 hours. The salt will draw out some moisture, create a concentrated brine on the surface, and then that brine will be reabsorbed.
- Benefit: Less messy than wet brining, promotes better browning, and still significantly improves juiciness and flavor.
Whichever method you choose, remember to rinse wet-brined chicken thoroughly and pat it dry before cooking to remove excess salt. For dry-brined chicken, simply pat dry if there's any surface moisture before cooking.
Mastering Even Cooking for Consistent Perfection
Chicken breasts often come in irregular shapes – thicker at one end and tapering to a thinner point. This unevenness is a major culprit for dry chicken, as the thin parts cook faster than the thick parts, leading to overcooked edges by the time the center is done. Achieving uniform thickness is key to mastering **how to cook chicken breasts** perfectly.
Pounding to Even Thickness
This is perhaps the most effective way to ensure even cooking.
- Place a chicken breast between two pieces of plastic wrap or in a large freezer bag.
- Using a meat mallet, rolling pin, or even a heavy-bottomed skillet, gently pound the thickest part of the breast until it's of uniform thickness (about 1/2 to 3/4 inch is ideal).
- This not only promotes even cooking but also tenderizes the meat.
Cutting into Uniform Pieces
If your recipe calls for smaller pieces, cut the breasts into cubes, strips, or medallions of roughly the same size. This ensures every piece cooks at the same rate, preventing some from drying out while others finish cooking. This is perfect for stir-fries, skewers, or adding to pasta dishes.
Your Go-To Method: Perfectly Baked Chicken Breasts in the Oven
Among the myriad ways to prepare chicken, baking in the oven stands out as one of the easiest, healthiest, and most customizable methods. It's a fantastic, no-mess, no-fuss approach that delivers consistently juicy results, especially after brining and evening out the meat.
Step-by-Step Oven Baking
- Preheat Your Oven: Start with a hot oven. 425°F (220°C) is ideal. This high heat cooks the chicken quickly from the inside while encouraging a lovely golden crust on the outside.
- Prepare Your Chicken:
- Brine your chicken breasts (dry or wet) as described above.
- Pound them to an even thickness.
- Pat them thoroughly dry. A dry surface is crucial for good browning.
- Season Generously: Even if you brined, a little extra seasoning never hurts. Rub them with olive oil, then season with your favorite blend of salt (if not brined), black pepper, garlic powder, paprika, dried herbs like thyme or oregano, or a pre-made spice rub.
- Choose Your Pan: A rimmed baking sheet is all you need. For easy cleanup, line it with parchment paper or foil.
- Bake to Perfection: Place the seasoned chicken breasts on the baking sheet. Bake for approximately 20-25 minutes, depending on the size and thickness of your chicken. For larger, thicker breasts, it might take a few minutes longer.
- Check for Doneness: The moment of truth! Insert an instant-read meat thermometer into the thickest part of a breast. It should read 165°F (74°C). If you want an extra golden-brown crust, you can also brown your chicken in an ovenproof skillet first (about 3-4 minutes per side) and then finish baking it in the oven for 10-15 minutes.
- Rest: Transfer the cooked chicken to a cutting board and tent loosely with foil. Let it rest for 5-10 minutes before slicing. This is non-negotiable for juicy results!
For even more detailed guidance on this fantastic method, check out our article on
Easy Oven Baked Chicken Breasts: Perfect for Weeknight Dinners.
Essential Tools for Success
- Instant-Read Meat Thermometer: The most important tool for preventing dry chicken.
- Rimmed Baking Sheet: For even baking and containing any juices.
- Meat Mallet/Pounder: For achieving uniform thickness.
Elevating Flavor: Seasoning and Beyond
While brining takes care of juiciness and foundational seasoning, the beauty of chicken breasts lies in their adaptability to a vast array of flavors. This is where you can truly make them your own.
Seasoning Strategies
- Salt is King: Beyond brining, ensure you use enough salt on the surface. It enhances all other flavors.
- Herbs & Spices: Experiment freely!
- Classic: Garlic powder, onion powder, paprika, black pepper.
- Mediterranean: Oregano, thyme, rosemary, lemon zest.
- Spicy: Chili powder, cayenne, cumin, smoked paprika.
- Asian-inspired: Ginger powder, garlic powder, a pinch of five-spice.
- Aromatics: Fresh minced garlic, grated ginger, or finely chopped shallots can be rubbed directly onto the chicken.
- Marinades (Optional): While not strictly necessary for moisture if brined, marinades can infuse deep flavor. Think citrus-herb, teriyaki, or yogurt-based marinades. Remember to pat dry after marinating for better browning.
- Coatings: For extra texture and flavor, consider a breadcrumb coating (mixed with Parmesan and herbs) or a cheese crust.
Creative Serving Ideas
Baked chicken breasts are incredibly versatile. Once you've mastered **how to cook chicken breasts** to perfection, the possibilities are endless for your weeknight dinners:
- Slice and add to a fresh green salad or a hearty grain bowl.
- Shred it and toss with your favorite pasta and sauce.
- Layer it into a quesadilla (a Ree Drummond favorite!) or a hearty sandwich.
- Cube and skewer for quick kebabs.
- Create a vibrant sheet pan dinner by baking the chicken alongside your favorite vegetables (broccoli, bell peppers, onions, potatoes) in the same pan, allowing the veggies to soak up those delicious pan juices.
For more inspiration on achieving that perfect tenderness, explore our dedicated article:
How to Cook Juicy Chicken Breasts: Say Goodbye to Dry Meals.
Conclusion
Dry, bland chicken breasts don't have to be your dinner destiny. By understanding the lean nature of this versatile protein and employing a few simple, yet powerful techniques, you can consistently achieve juicy, flavorful results. Embrace brining, ensure even thickness, rely on your trusty meat thermometer, and always allow for a proper resting period. With these secrets in your culinary arsenal, you're now equipped to master **how to cook chicken breasts** like a pro, turning a once-dreaded meal into a delicious and satisfying experience for you and your family. So go ahead, experiment with flavors, and enjoy the succulent rewards!